Friday, March 16, 2012

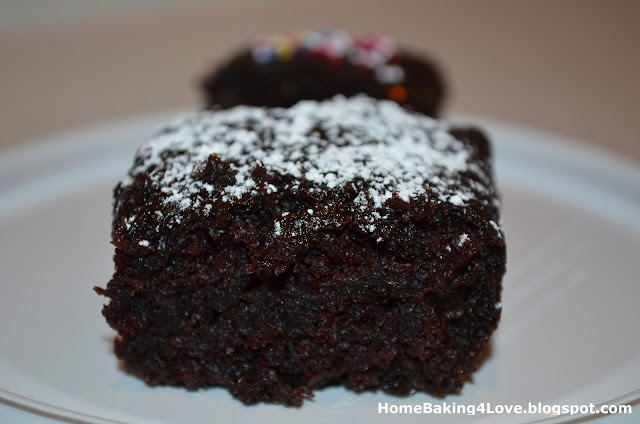
Chocolate Cake

Since i still have much cocoa powder left, i try to make a chocolate cake this time.


Mhmm....how should i describe it?  The taste did not cling to my taste bud, i felt that it was a bit bitter, perhaps i did not compliment it with the chocolate frosting....?

When this was out from the oven, my first impression was: it looks ugly.  :P 


Then, i tried to beautify it with some colourful sprinkle....


No luck.  Mhmm...how 'bout icing sugar..... 


Don't think i have any luck either, still a pretty much unattractive cake...  :( 

Err...maybe a little sweet treat will make it look nicer...??


I guess it looks a bit better?  Anyway, thanks to my three lovely supportive lovers, no matter how good or bad my baking/cooking turn out, they always give their full support by finishing it all inside their great stomach!  :D

Ingredients:
  • 200g all purpose flour
  • 200g white sugar
  • 25ml cocoa powder, sifted
  • 1 tsp baking powder
  • 3/4 tsp baking soda
  • 1/4 tsp salt
  • 1/3 cup (75g) unsalted butter, melted
  • 240ml warm water
  • 1 TBSP lemon juice (i use orange juice instead)
  • 1 tsp vanilla extract
Steps:
  1. Spray a 8' square pan with non-stick vegetable spray & set aside
  2. Preheat oven to 350F/180C
  3. Stir together all the dry ingredients (flour, sugar, cocoa powder salt, baking powder, baking soda) in a bowl & set aside
  4. Add the wet ingredients (melted butter, vanilla, juice, water) into the dry ingredients and mix all together until well blended
  5. Scrap batter into the square pan and bake for about 30min  
  6. When it is done, remove from oven and place on a wire rack to cool

Ginger Chicken


Though it's approaching Spring soon, but the weather here is still rather cool.  It has been raining almost every day this week and few days ago, it was snowing.  

Snow, while leaving to shcool in the morning
My two little lovers seems to catch a mild flu, i then thought of preparing ginger chicken since ginger has long been consider as a natural treatment or prevention for colds and the flu, according to the Chinese elderly. 

Back in my hometown, ginger chicken is commonly prepared with sesame oil, where it's named sesame ginger chicken.  As i do not have sesame oil and given that i will not be using it much often, i've therefore left this ingredients out, but added the oyster source.  However, i used to prepare this dish with just the basic ingredients that every kitchen has like cooking oil, salt, sugar, soy source, before my kitchen has oyster source, and the taste was just as tasty.  :)

Ingredients:
  • 1 pound chicken (boneless/skinless or not according to individual preference)
  • 2 TBSPs cooking oil
  • 1/4 ginger, peeled & sliced
  • 1/2 tsp chopped garlic
  • 2 tsp soy source
  • 1 tsp oyster source  
  • 1/4 tsp salt
  • 1/4 tsp sugar

Steps:
  1. Thoroughly clean the chicken and drain
  2. Place a stir-fry pan over high heat, add the oil, swirling to coat the sides
  3. Add the chopped garlic, stirring and cook till fragrant, about 2 seconds
  4. Add the chicken and stir-fry till it is no longer pink in the center, add some water if necessary
  5. Add the sliced ginger, stirring and cook for 1-2 minutes
  6. Add all the other ingredients and continue cooking till the chicken is thoroughly cooked
  7. Transfer to a serving plate and serve

Notes:
  • Ginger may be added together with garlic (step 3) and cook till the oil infused with its flavor if desired a heavier ginger taste (I added the ginger only in step 5 so that the ginger taste is not too heavy that my two littler lovers can't take it).

Thursday, March 15, 2012

Simple Steamed Fish


No dish can be simpler.  This takes only few ingredients to put together and the dish is done together with the rice if you have a rice cooker that come together with a steamer.  Otherwise, steam this using a wok. 

I like this dish not only that this is quick and fast in preparation, but also fish is always perceived as a healthier diet especially with my two litter lovers in mind.  :)


Ingredients:
  • 3-4 fish fillets (or as many as you wish)  
  • 1/8 tsp salt
  • 1 tomato, cut into slices or wedges
  • few thickly sliced ginger
  • 1/2 tsp chopped garlic
  • 1/2 tsp soy source 
Steps:
  1. Sprinkle the fish with the salt and lightly drain off under the running water
  2. Place the fish fillets in a heatproof bowl
  3. Arrange the tomato slices around the bowl
  4. Sprinkle the chopped garlic and sliced ginger over the fish
  5. Place the bowl in a wok/deep pan (above a wire rack) filled with few inches of water, cover, and steam over medium-high heat until heated through, about 10-15mins
  6. Remove the bowl from the pan, add the soy sauce and serve.
    

Monday, March 12, 2012

My 1st Loaf of Homemade Bread (原來,面包真的佷香。。。)


~ 焙烘蛋糕让人感觉好快乐,而烘烤面包则让人感觉很幸福~

Can't believe i made my 1st loaf of bread!  Though there was a little accident in the beginning process, with my supportive hubby's little intellegence, i managed to overcome it and the bread turn out just as good.  :)


1st time of bread making, the feeling was marvelous and i was completely thrilled when the fresh loaf was out from the oven. 


The loaf looked so lovely and pretty with the golden brown colour and the smell was heavenly.  Till i tasted the bread, i was completely satisfied and i'm telling myself, i am going to make more bread in future!


The loaf was gone pretty fast in 1.5 days, which tell how popular this was in my family.  My two little lovers have it both for their breakfast and afternoon tea-time, then kept asking for more.  My 2yrs old lover's first reaction on her
first bite on it: "Mhmm.....yummy!!"  (LOL...perhaps they have enough cake and they can't wait to welcome this new food).

The four members at home all have our own preference of how the bread was served.  The daddy like to have it with butter & sugar:


My 2yrs old lover like to dip it with her milk:


While the 5yrs old lover like to eat it with ice-cream, reminded me of the ice-cream cart that goes around the neighbourhood during my childhood.


And for me, i like to have it with ice-cream too.......a more gready one. (;P) 


But, i prefer most to have it with my home-made strawberry jam.  Wohoo....that was soooo delicious and irressitable!  (Do pardon me for bragging, just can't hold it.  ;P)

Yummy home-made strawberry jam
I have always wanted to try making some bread but was a bit reluctant considering the time required to make a bread.  From start to prepare the dough till get a loaf out from the oven, it would easily take at least 3-4 hours included the resting time for the dough to rise/proof.  Luckily i came across this wonderful quick and easy recipe that is just right for the 1st time bread maker like me.  Frst time doing bread kneading, it was kind of fun.  So get your hands dirty & have some fun doing bread kneading, it was rewarding!              

Ingredients:
  • 330g all purpose flour
  • 1 TBSP active dry yeast
  • 1 TBSP white sugar
  • 1 TBSP soften butter
  • 1 tsp salt
  • 1 cup of warm water

Steps:
  1. Mix the flour, yeast, sugar and salt with a stand mixer/electrical mixer (using speed 2)
  2. Gradually add in the water untill a nice consistence dough is made
  3. Add in the soften butter and continue mixing till the dough starts to clean sides of bowl.  Dough should be slightly sticky to the touch
  4. Put the dough on the kneading surface with a bit of flour and start kneading to form into a ball
  5. Then, leave it on the kneading surface and let it rest for at least 15mins (i rest it for 'bout 25mins), you will notice the dough become bigger
  6. While waiting for the dough to rest, preheat the oven to 350F/180C and spray a loaf pan with non-sticky vegetable spray, set aside
  7. After 15mins, take the dough and roll it into about 10 inches long
  8. Then, devide it in two equal parts and roll it again into 2 rolls of about 15 inches long
  9. Connect the 2 rolls at one end, and start braiding them together (just like doing a hair braid)
  10. Once done with braiding, put the dough slowly into the loaf pan, bake for about 30mins
  11. Remove it from the oven and let it cool on a wire rack for at least 15min before cutting it to avoid gummy inside
  12. Then, serve it with anything that you like...butter, milk, ice-cream, jam, are just the fews that my lovers enjoy! 
Notes:
  • For a nicer colour bread, you may brush the dough with a lightly beaten egg/butter (i brush it with a lightly beaten egg)
  • If you are not rushing, you may rest the dough for 30min.  But according to the recipe owner, there's no significant differences in taste if rest for 15 or 30min. 
  • If you wish to skip the braiding, you may just shape the dough into a loaf, put it into the loaf pan, and bake for about 30min

Recipe source: Homemade Bread Recipe

Fried Butter Prawn


Missed the deep fried butter prawn at my home country and tried to make some in my kitchen few days ago to satisfy my crave.  

Reference few recipes and due to limited ingredients that i can find in my kitchen, i've come out with my own version of butter prawn.  The taste of course not close to the one we used to have in Malaysia, but at least it make me felt less homesick after eating it.   ;P


Ingredients:
  • Medium size prawns (i used 12), heads off, shells intact
  • Oil for frying
  • 1 egg  (beaten)
  • 3 TBSP butter
  • 1/2 tsp garlic
  • 1 tsp salt
  • 1 tsp soy source
  • 2 TBSP butter
  • 1 TBSP tempura batter mix

Steps:
  1. Dip prawns into batter, deep fry in hot oil in a wok until cooked (i did in 2 batches).  Drain and set aside
  2. Melt the butter in a wok, gradually add in beaten egg mixture slowly and keep stirring until they separated into tiny pieces and golden brown
  3. Add in the prawn, garlic, salt, soy source and stir cook under low-medium heat for 1-2min. 
  4. Transfer to a serving plate and garnish with some parsley

Sunday, March 11, 2012

Steamed Tofu with Minced Pork


This simple and quick dish takes only minutes to put together.  Steaming is a wonderful way to cook low-fat dishes and if you like less oily dish, this is great in taste and yet nutrition. 

I have a rice cooker that come together with a steamer and i normally use that for all my steamed dish, which is quick and easy.  When my rice is cooked, the dish is ready too.  If you don't have one, you can steam a dish on a heatproof bowl place on top of a wire rack, inside a wok or deep pan (on to top of a wire rack) that filled with few inches of water. Cover the pan and bring the water to a boil, steam according to the recipe's recommended time.

Ingredients:
  • 1/2 package of tofu (soft or medium firm)
  • pork meat (minced)
  • dried shrimp (chopped)
  • 1/2 tsp of chopped garlic
  • 1-2 tsp of soy sauce
Steps:
  • Drain the tofu and slices into half,
  • Place the tofu in a heatproof bowl
  • Add the minced pork meat on top of the tofu
  • Sprinkle the chopped dried shrimp and chopped garlic on top
  • Place the bowl in the wok/deep pan, cover, and steam over medium-high heat until heated through, about 5mins
  • Remove the bowl from the pan, add the soy sauce and serve.


Friday, March 9, 2012

Spinach Minced Pork Cake

This simple & easy to prepare spinach minced pork cake in bite-size pieces, just perfect for the little hands of my two little lovers.

Bite-size Spinach Minced Pork Cake
  Ingredients:
  • Pork Meat (minced)
  • Spinach (minced)
  • Cooking oil
      Marinade
  • 1 TBSP soy source
  • 1/2 tsp salt
  • 1/4 tsp tomato source

Steps:
  • Mixed well the minced pork meat & minced spinach in a bowl
  • Add the marinade ingredients onto the meat and mix well till all blended
  • Divide the meat into bite-size pieces  
  • Marinade at least 30min (As i prepared this in noon for dinner, i marinade for few hours in the refrigerator)
  • Bring a wok to medium heat with cooking oil, add in the bite size pieces marinate meat in batches of 6-8 pieces and cover the wok with the lid, cook for few minutes
  • Lift the lid up and turn the pieces over occasionally, cook until the pieces started to turn into golden brown